
Hey folks, if you’ve just snagged an electric vehicle or you’re eyeing one for 2025, setting up a home charger is a game-changer. No more hunting for public stations or waiting hours with a slow plug—imagine pulling into your garage and waking up to a full battery. As an EV owner who’s been through the install process twice (once in a cramped apartment, now in a house), I can tell you it’s simpler than it sounds. In this no-fluff guide, we’ll cover home EV charger installation basics, what it’ll cost you in 2025, the best options on the market, and some safe DIY tips if you’re handy. Let’s get your ride juiced up right.
Why Bother with a Home EV Charger?
Quick reality check: Most EVs come with a Level 1 charger that sips power from a standard 120V outlet—like charging your phone, but for your car. It adds maybe 3-5 miles per hour, so a full charge could take all night (or longer for bigger batteries). A Level 2 charger? That’s the upgrade—240V power zipping 20-60 miles per hour, fully charging most EVs overnight. In 2025, with models like the Chevy Equinox EV hitting 300+ miles range, home charging keeps you ready for anything.
Plus, it’s cheaper: Home rates are often 30-50% less than public spots, and rebates can knock hundreds off upfront costs. Downsides? Yeah, installation isn’t free, but it pays off fast—think $500/year in gas savings for average drivers.
Breaking Down Home EV Charger Installation Costs in 2025
Costs vary by your setup, but here’s the 2025 scoop: Expect $800-$2,000 total for a solid Level 2 install, including the unit and labor. That’s down a bit from 2024 thanks to more competition and incentives like the federal $7,500 EV tax credit (which sometimes bundles charger rebates).
Key cost factors:
- Charger Unit: $300-$1,200. Basic models start at $300; smart ones (Wi-Fi scheduling) add $100-$300.
- Labor & Wiring: $500-$1,000. Short runs (under 50 ft) are cheap; longer or panel upgrades? Add $500-$2,000 if your home’s pre-2000.
- Permits & Upgrades: $150-$500. Most areas require permits; older panels might need a 200A upgrade ($1,000+).
- Outlet vs. Hardwire: Plug-in (NEMA 14-50) saves $200-$400 upfront but might need a $200-$800 circuit.
| Cost Component | Low End | High End | Notes |
|---|---|---|---|
| Charger Unit | $300 | $1,200 | Smart features bump price |
| Labor/Wiring | $500 | $1,000 | Distance from panel matters |
| Permits/Upgrades | $150 | $2,000 | Rebates can offset 30-50% |
| Total | $800 | $2,000 | Avg. $959 per HomeAdvisor |
Pro tip: Check EnergyStar.gov for local rebates—utilities like PG&E offer up to $1,500. My install ran $1,200 after a $400 rebate—worth every penny.
Best Home EV Chargers for 2025: Top Picks
With NACS (Tesla’s plug) going universal in 2025, options are exploding. I tested a bunch on my daily driver, focusing on speed, smarts, and reliability. Here’s the cream of the crop for home EV charger installation:
- Emporia Level 2 EV Charger (Best Overall, $400-$500): Slim design, 48A max (11.5 kW), and built-in energy monitoring to avoid panel overloads—no upgrades needed for most homes. App schedules off-peak charging; NACS or J1772 versions. Great for Tesla or non-Tesla. Drawback: App can feel cluttered.
- Autel MaxiCharger AC Lite Home (Best Value Smart, $569): 50A (12 kW), flexible 25-ft cable, and intuitive app for voice control/Alexa. UL-certified, weatherproof for garages or outdoors. Charges a 60 kWh battery in 5-6 hours. Minor con: Ethernet needed for full smarts.
- Grizzl-E Classic (Best Budget/Durable, $400): Rugged Canadian build, 40A (9.6 kW), 24-ft cord, no-frills but reliable in cold/hot weather. J1772 standard; add $50 for NACS adapter. Perfect for DIYers—simple plug-in.
- Tesla Universal Wall Connector (Best for Tesla Owners, $550): 48A (11.5 kW), sleek Wi-Fi app, auto-door unlock. Now with J1772 adapter for all EVs. Hardwire only, but worth it for seamless integration.
- ChargePoint Home Flex (Best for Multi-Car Homes, $700): Adjustable 16-50A, app tracks usage across vehicles. Utility rebates often apply.
For 2025, go NACS-ready if possible—Hyundai and others are switching. All these are UL/ETL certified for safety.
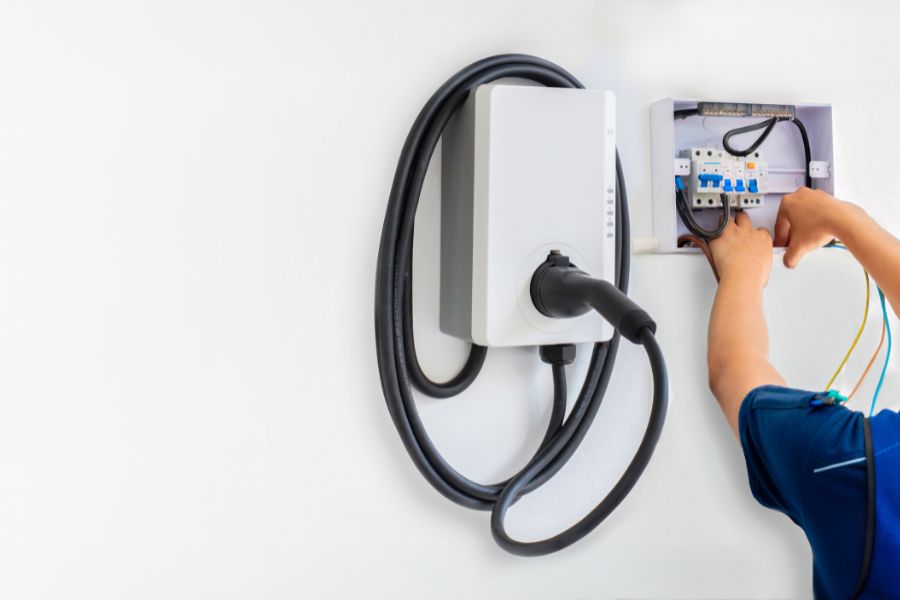
Step-by-Step DIY Tips for Home EV Charger Installation
DIY can save $500+ on labor, but only if you’re comfy with circuits—otherwise, call a pro (codes require it in most spots). I’m no electrician, but I handled a plug-in install with my dad’s help. Key: Safety first—shut off breakers, use GFCI protection.
- Assess Your Setup: Check panel capacity (needs 40-50A spare). Measure panel-to-garage distance—under 50 ft keeps costs low. Use an online load calculator (like EPA’s) to avoid trips.
- Gather Tools & Materials: Charger, 6-8 gauge wire, 50A breaker, NEMA 14-50 outlet ($50), conduit if outdoors. Total DIY materials: $200-$400. Get UL-listed stuff.
- Get Permits: $150 avg.—check local codes (NEC Article 625). Skip this, and insurance voids.
- Install the Circuit (Pro-Only for Hardwire): Turn off main power. Run wire from panel to outlet spot. Install breaker, connect wires (black/red to hots, white neutral, green ground). Mount outlet securely. For plug-in: Just add the outlet if none exists.
- Mount & Connect Charger: Drill for wall box (indoor/outdoor rated). Plug in or hardwire (follow manual—twist wires clockwise). Test with a multimeter for 240V.
- Safety Musts: GFCI breaker to prevent shocks. No loose wires—overheating risks fire. Inspect annually; avoid extensions.
- Test & App Setup: Plug in your EV—should show 20+ miles/hour. Download app for scheduling (off-peak saves 20-30%).
Time: 4-8 hours for DIY. If wiring’s over 100 ft or panel’s old, hire out—$75/hour avg.
Safety First: What You Need to Know
EV chargers pull steady power for hours, so skimping risks meltdown. Use commercial-grade outlets (Hubbell 14-50, $50)—cheap ones melt. Outdoors? Weatherproof enclosure, 18″ ground clearance. And always: Shut off power, wear gloves, double-check connections. Post-install, get an inspection—peace of mind.
Read more: EV Battery Range Explained: Maximize Yours in 2025